
Introduction
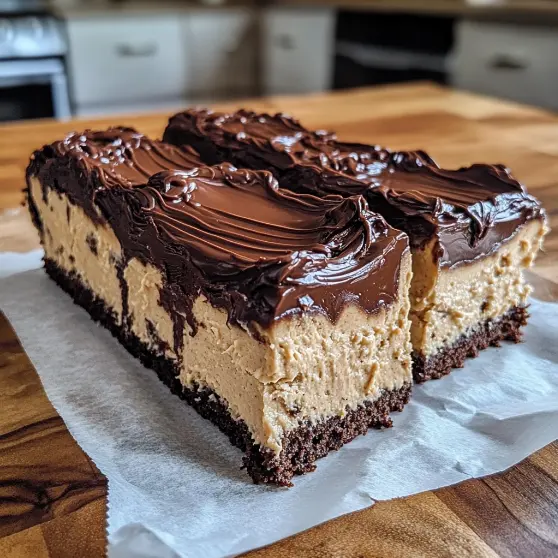
Here’s the thing: I used to think “healthy dessert” was an oxymoron. Then I discovered these no-bake Greek yogurt peanut butter cheesecake bars, and I never looked back. They’re fudgy, creamy, and ridiculously easy to make without touching an oven. What surprised me most? Nobody could tell they’re packed with protein and real nutrition. These bars have become my go-to treat when I want something indulgent but guilt-free.
Why You’ll Love This Recipe
No baking required — Just mix, press, chill, and slice. Perfect for hot days or when your oven’s already packed.
High-protein powerhouse — Greek yogurt and peanut butter make these naturally filling and energizing.
Creamy, fudgy texture — The cheesecake layer is smooth and rich; the chocolate topping adds that gooey satisfaction.
Make-ahead friendly — Prepare them the night before and grab one whenever you need a snack or dessert.
Family-approved — Even people who swear they don’t eat healthy desserts ask for seconds.
Ingredients Needed
For the Crust:
- 1½ cups chocolate cookie crumbs
- ¼ cup melted butter
- 2 tablespoons honey
For the Cheesecake Filling:
- 1½ cups Greek yogurt
- 8 oz light cream cheese, softened
- ½ cup peanut butter
- ¼ cup honey or maple syrup
- 1 teaspoon vanilla extract
For the Chocolate Fudge Topping:
- 1 cup chocolate chips
- ⅓ cup coconut oil or butter
- 2 tablespoons cocoa powder
- 1 tablespoon honey
- Pinch of sea salt
Ingredient Notes
I always reach for full-fat Greek yogurt — it’s creamier than the plain kind and makes a noticeable difference in texture. Trust me on this. For the cream cheese, let it sit out for 20 minutes so it blends smoothly without lumps. I prefer natural peanut butter (just peanuts and salt) because it keeps things simple, but regular works fine too. The chocolate chips for the topping should be high-quality; I’ve noticed a real taste difference between brands. Finally, that pinch of salt in the fudge? It’s not optional — it balances the sweetness and makes the chocolate sing.
How to Make It
Step 1: Create the Cookie Crust Foundation
Mix the chocolate cookie crumbs, melted butter, and honey in a bowl until it resembles wet sand. Press this mixture firmly into the bottom of a 9×9-inch parchment-lined pan. Use the bottom of a measuring cup to create an even, compact layer. This step matters because a loose crust leads to falling-apart bars later. Trust me, I learned that the hard way.
Step 2: Blend the Creamy Cheesecake Filling
Add Greek yogurt, softened cream cheese, peanut butter, honey, and vanilla to a mixing bowl. Blend until completely smooth and creamy — about 2 minutes with an electric mixer. The filling should be thick but spreadable. If it feels too loose, you likely used regular yogurt instead of Greek; that’s okay, just chill it longer. Taste it here; adjust sweetness if needed.
Step 3: Spread and Smooth the Filling Layer
Pour the cheesecake mixture over your crust and smooth it into an even layer using an offset spatula or the back of a spoon. Make sure it reaches all corners so every bite has that creamy filling. This is where patience pays off — a few extra seconds smoothing creates bars that look (and taste) intentional.
Step 4: Chill the Base Completely
Refrigerate the pan for at least 2 hours, or ideally overnight. This firms up the filling so it doesn’t squish when you spread the fudge topping. Honestly, I usually do this step before bed and finish the bars the next morning — it’s a smart way to spread the work.
Step 5: Add the Silky Chocolate Fudge Topping
Melt chocolate chips and coconut oil together (microwave works fine; 30-second bursts, stirring between each). Whisk in cocoa powder, honey, and sea salt. Let it cool slightly, then pour over the chilled filling and smooth it flat. Return to the fridge for 30 minutes so the fudge sets. The result? A glossy, snappable chocolate layer that looks professionally made.
Key Ingredients & Health Benefits
Greek Yogurt is the MVP here. It brings creaminess without the heaviness of regular cream cheese, plus you’re getting 15+ grams of protein per serving. The tanginess also cuts through the sweetness naturally, so you don’t need as much sugar overall.
Peanut Butter adds richness, healthy fats, and that comforting nutty flavor people crave. It also keeps you satisfied longer — these bars won’t leave you hungry 20 minutes later like some desserts do.
Chocolate Chips aren’t just indulgence; dark chocolate contains antioxidants, and when used mindfully (not excessively), it’s a smart addition to recipes. The cocoa powder adds depth without extra sugar, which I appreciate.
Customization Ideas
Swap the chocolate topping for a peanut butter fudge layer — melt peanut butter with chocolate chips for a nuttier finish. Add a drizzle of salted caramel on top of the fudge for extra elegance. Mix crushed pretzels or granola into the cookie crust for textural contrast. Use almond butter instead of peanut butter if that’s your preference — the result is equally creamy and delicious. Top with a sprinkle of flaky sea salt after the fudge sets for a sweet-salty kick.
Pro Tips & Common Mistakes
Pro Tip #1: Don’t skip chilling between layers. I know it feels slow, but rushing this leads to sloppy bars that fall apart. A solid cheesecake layer is your foundation for success.
Pro Tip #2: Use parchment paper in your pan — it makes removal and cutting so much easier. Cut your bars with a warm, dry knife and wipe between slices for clean edges.
Pro Tip #3: If your fudge topping cracks as it sets, it cooled too quickly. Next time, let it sit at room temperature for 5 minutes before spreading so it’s slightly warm and flexible.
Common Mistake: Overmixing the cheesecake filling. Stop once it’s smooth and creamy; overmixing introduces air and can make it grainy. Thirty seconds of calm blending beats two minutes of aggressive mixing.
Storing & Freezing Guide
These bars keep in an airtight container in the fridge for 5–7 days. The fudge topping stays glossy and snappable the whole time. For freezing, wrap each bar individually in plastic wrap and place them in a freezer bag — they’ll stay fresh for up to 3 months. Thaw in the fridge overnight before eating; don’t leave them on the counter or the chocolate will separate. I often thaw a couple bars the night before for a grab-and-go breakfast or snack.
FAQs
Can I use regular cream cheese instead of light?
Absolutely. Regular cream cheese will make them slightly richer, but you might want to add a touch more honey to balance the tanginess of the yogurt. The texture will be creamier either way.
What if I don’t have coconut oil for the fudge topping?
Butter works perfectly fine. You’ll get a slightly less smooth finish as it cools, but the flavor is identical and equally delicious.
Are these actually healthy?
They’re genuinely better-for-you than traditional cheesecake bars because they’re packed with protein, use Greek yogurt instead of extra cream cheese, and contain no refined flour. That said, they’re still dessert — enjoy them mindfully as part of a balanced diet.
Can I make these in a smaller pan?
Yes, use a 6×6-inch or 8×8-inch pan and adjust baking time accordingly. Smaller pans mean thicker bars, which some people prefer. The flavor stays exactly the same.
Final Thoughts
These no-bake Greek yogurt peanut butter cheesecake bars remind me why homemade desserts beat store-bought every single time. They’re simple, they’re honest, and they taste like someone actually cared when making them. I’d love to hear what you think if you try them — drop a comment below or tag me on social media. Did you add your own twist? I’m always excited to see how people make these bars their own.